


")


A quick guide to the parking overlays on your reversing camera
The advantages of reversing cameras are wide-ranging, and most are pretty widely-known. Their ability to provide a clear, unobstructed view behind your vehicle has a number of safety benefits, giving you a better chance of seeing vulnerable road users like cyclists, young children or pets from suddenly moving out into the path of your car - and in doing so, reversing cameras can help you avoid a catastrophe.
In addition to these invaluable safety benefits, though, it can also be highly convenient. Some of the more advanced models of reversing cameras have digital overlays which can make it far quicker, easier and less stressful for you to park up. Now, every driver has at least a basic ability to reverse-park, but these reversing camera overlays can be exceptionally helpful in narrow spaces, residential driveways or built-up areas like shopping centres.
How to use dynamic parking lines
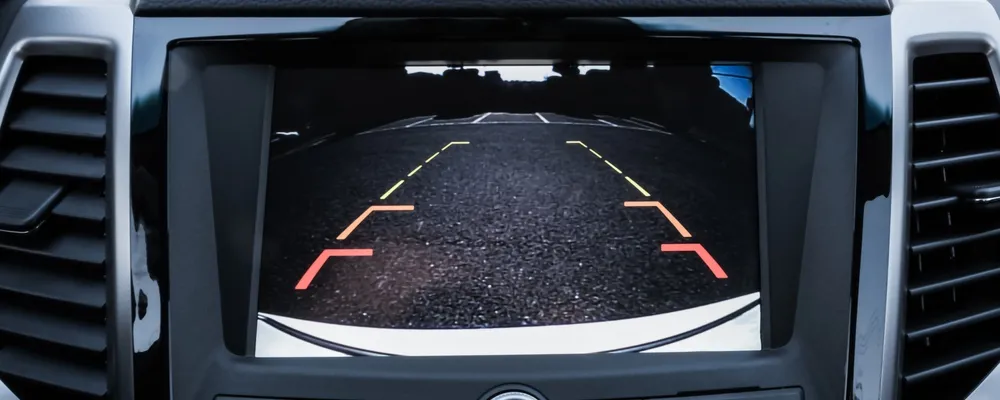
You probably already know the basic functionality of a reversing camera; as soon as you shift the car into reverse, it’ll activate a screen either on your centre console, or on the left side of your rear view mirror, so you can see where you’re going. If your reversing camera is equipped with dynamic parking lines, the view from your reversing camera will be outlined with a geometric overlay. Their colours can vary between different models of reversing camera.
Active guidelines
These tend to be solid white, and along the vertical edges of the rectangle. They’re designed to help you get a better idea of the width of your car, helping you to calculate your angle of approach, guiding you in so you don’t scrape against a bollard or nearby car.
Centre guidelines
Not every reversing camera has one of these, but it can be helpful if they do. As the name suggests, the centre guideline runs down the middle of the rectangle, dissecting it vertically and running parallel to the active guidelines. It’s especially helpful if you’re backing up to a trailer which you plan to hook onto the back of your vehicle.
Green (furthest) lines
These are often at the top horizontal edge of the rectangle, and help you to mark the objects furthest from your vehicle. If the obstruction is only touching the green lines, you’ve usually got plenty of room to park quite comfortably.
Yellow (medium) lines
Halfway down from the green lines will be some form of medium one. (This is typically yellow, but as we mentioned above, the colours can vary.) Stopping at this midway point means you’ve usually got enough room to fit a sizeable object behind your car, for example a pram or a shopping trolley.
Red (close) lines
The closest line could be red, or take the form of dotted lines instead. Either way, if you ever back up so far as to have an obstruction touching that closest line, it’s a good bet that you won’t even have enough room to open your boot. Ideally, if you do ever deliberately get this close, you’ll need to make sure that whatever the obstruction is, it’s stationary. Otherwise it’s incredibly risky, even if that object is alive and aware of you!
Using all these in tandem, you’ll be able to manoeuvre into even the trickiest of parking spaces. As an added bonus, you’ll also often be able to spot particularly low obstacles that parking sensors can’t always detect. In fact if you have added parking sensors, it makes it even easier, although most drivers are quite content to use one or the other. Here at Car Communications, we stock both, and recently did a post on how to make the decision between them.
We also offer an installation service so that we can fit them on your behalf if you’ve not got the time or confidence!